
When I first started coding, one of the things I struggled with most was figuring out my “set up.” I wanted to know how exactly programmers get their code online—Where do they write it? How do they transition between building a site and making it live? Where do all the files live?? Where do you make edits if you want to change a file that’s already online? I didn’t know at the time, but my question was really: “How should I set up my coding environment?”
Streamlining your coding environment is particularly important in WordPress.
Have you ever tested out a small change on your WordPress site only to have the entire site come “crashing down”? Or maybe you have tried to build a new site—not wanting the world to see it yet—only to notice that your “test site” is receiving traffic from Google.
A solution to problems like these (and others) is creating websites locally using the free MAMP application. When you develop a site “locally,” it means you can build it on your computer and simulate an online environment without putting your site online for the world to see. MAMP allows you to build and test WordPress sites offline, entirely on your own computer.
I created this walkthrough to show beginners (like I was!) how to get MAMP up and running on your computer so you’ll have a fully functioning coding environment for developing a WordPress site.
In this article you’ll learn:
- What MAMP is and why you should use it
- How to install and configure MAMP on your computer
- How to install WordPress on your computer (and where to store it)
- And how to use MAMP in the future with other sites you’d like to test
I’ll break everything down step-by-step, with screenshots and additional articles you can turn to.
What is MAMP?
MAMP stands for Macintosh, Apache, MySQL and PHP. Basically, it is a free application you can install on your Mac laptop or desktop computer that gives you access to a local Apache server.Here is a breakdown of the four components of MAMP:
- Macintosh: an operating system
- Apache: an open source web server
- MySQL: most widely available relational database in the world (all WordPress sites use MySQL databases)
- PHP: server-side scripting language (which WordPress sites run on)
Trippy. I know.
All the websites we visit online day in and day out run on web servers, designated computers that are programmed to do one thing: serve information from a database to your browser window. Every time you visit a webpage, a server grabs information from a database (an actual building full of storage!) and sends it back to your browser.
However, the computers you and I use every day are not on web servers. And they are not connected directly to the Internet. Instead, we connect indirectly to the Internet through internet service providers (ISP).
If you’re unsure of how the Internet works, I highly recommend watching this short (less than 5 minutes) YouTube video.
Basically, just know that MAMP allows you to run a WordPress site on your computer only (without anyone else being able to see it because it is not actually on the Internet).
Which is why MAMP is awesome for testing out new features on your existing site, making bigger changes, or building an entire site from scratch.
While MAMP is for Macintosh users, WAMP is available for Windows users. It works in a similar way using Apache, PHP and MySQL. It is also free to download. (For WAMP-specific setup instructions, watch this video.)
Why Use MAMP?
MAMP has many uses and benefits. It allows you to:- Develop and design your site locally—no need to worry about “breaking” the live site by testing out a few changes
- Build sites you don’t want the world to see (since search engines can’t index your local site)
- Work in a faster development environment (because it doesn’t rely on an internet connection and communicating with a web server)
- Work offline (great for trips on airplanes)
- Use the local install as a partial backup of your existing site
- Develop sites in a secure environment (again, because MAMP sites are not online, it makes it basically impossible to be hacked or have some other kind of security breach)
12 Steps to Installing WordPress Locally
Step 1: Install The Latest Version of WordPress
First download the latest version of WordPress as a zip file. This should only take several seconds. Just visit WordPress.org and click the “Download WordPress” button.Next, open up a new finder window (⌘N) from your desktop. You should be in your user directory. (If not, make sure you are.)
In your user directory, (mine is “laurencebradford”) create a new folder called “sites” (if you don’t already have one).


Step 2: Install MAMP on Your Laptop/Computer
Next, you want to install MAMP on your machine. Do this by heading over to the official MAMP website.
Click on “download” below the free version. The free version should be sufficient for beginners.

MAMP should start downloading automatically. It can take a few minutes to download.
When it is finished, click on the download and a typical installation box will appear.

Continue through the steps past installation.
Step 3: Launching MAMP From Your Applications Folder
Go into your Applications folder (where MAMP should have been saved in the previous step) and click the “MAMP” folder.


Step 4: Setting the Ports
While looking at the MAMP box, click “Preferences”.Make sure the “Ports” tab is selected.

I have my ports (pictured above) set on the default. (Which is 8888 for Apache, and 8889 for MySQL.)
However, others recommend setting it to the suggested ports 80 and 3306. If you’re a more advanced user and would like to learn about using these ports and setting up WordPress multi-site installations, check out this tutorial. Otherwise, stick to the defaults above.
Step 5 : Configure the Web Server and Document Root
Now click on the “Web Server” tab.Make sure the web server selected is “Apache”.

Now, you’ll need to set the document root. The document root is where all your files for you local web server will be stored.
My document root, as shown in the photo above, is: Macintosh HD > Applications > MAMP > htdocs
Mine is this way because of how I installed and setup MAMP initially.
But remember back in step one when we created the new folders with the fresh WordPress install zip file?
That’s going to be your document root.
To change/set your document root, click the gray folder icon. A finder window will appear, where you can select the document root.
Below is what yours should look like when you set the root to the “wordpress” folder in the “sites” directory (except with your name rather than “laurencebradford”).

The folder path would be: Users > laurencebradford > sites > wordpress
However, it is important to realize that by setting up the document root, you are not changing the location of MAMP (the application). You are simply specifying where MAMP will be looking for the files.
(Pro tip: I store both the MAMP application and my document root folder in the dock at the bottom of my screen for easy access.)
Step 6: Start Your Servers
Let’s make sure everything is working up to this point.Click on the “Open start page” option in the MAMP box.

(Note: If you can’t click it, your servers probably aren’t turned on. The green color in the tiny boxes on the top right indicates that the servers are indeed turned on, as shown above.)
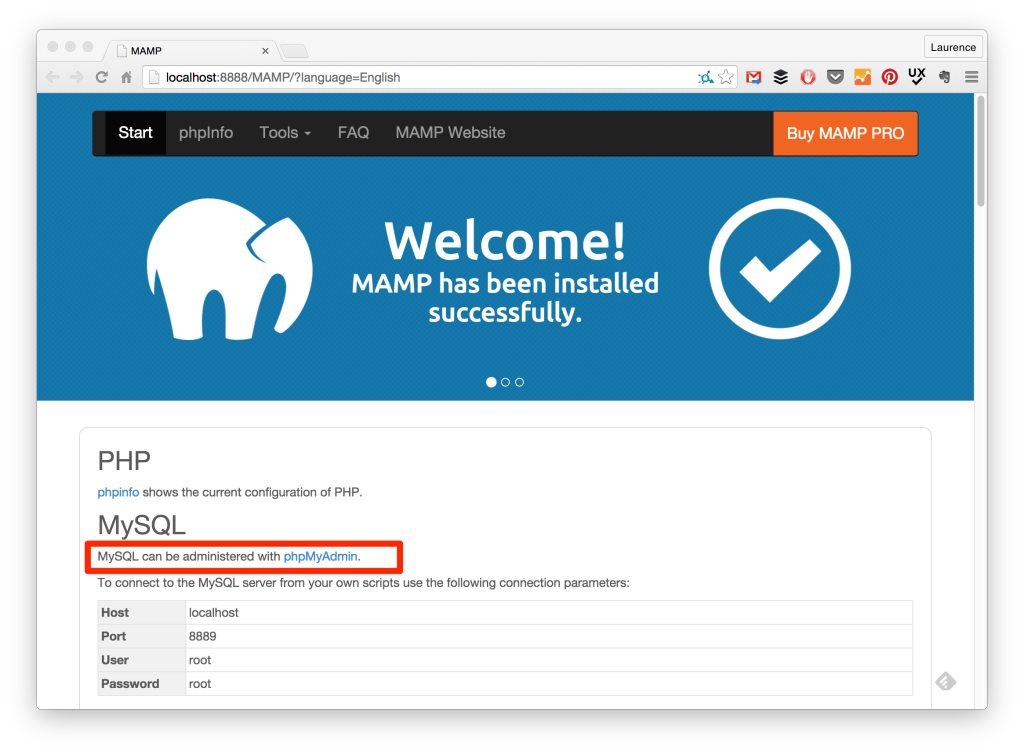
After clicking “Open start page”, you’ll be brought to a page that looks like this.

Information on this start page indicates your setup and other MAMP news / info.
Step 7: Create a MySQL Database
Before you can get going with WordPress locally, you need to create a database for your install to live on.MySQL is one of the most popular relational databases in the world. It is open source and without a doubt the most widely accessible. And all WordPress sites run on MySQL databases.
To build simple, or even more complex, WordPress sites you don’t have to know all the ins and outs of MySQL or databases in general. Just understand that databases are used to store data on most websites and web applications. Data like usernames, blog posts, comments, images, and so forth.
(However, also realize that you don’t need a database to build a site. You can build a simple one-page site with just HTML and CSS—no database—and it would still be a website. It would just be static site rather than dynamic.)
When using MAMP, you create new databases in phpMyAdmin. (Note: every time you want to create a new WordPress site locally you must create a new database!)
There are two options of getting to phpMyAdmin:
- Visit the URL http://localhost:8888/phpMyAdmin
- Or on the MAMP start page in your browser, click the phpMyAdmin link
Your phpMyAdmin panel will look similar to below…

…Except without all the databases listed on the left-hand side bar. (These are names of databases I have created in the past for my own local WordPress sites.)
What you should see, though, are these three in the side panel:
- information_schema
- mysql
- performance_schema
Name your database whatever you like. I typically name mine so I know which site it correlates with. (Even though, as you can see, in the past some of my database name choices are a little vague…)
I named my new database “skillcrush_db”.

After you name your database, click the “create” button.
Step 8 : Unzipping the WordPress Install
Now, head back over to the root folder you set up previously in step one.If you’ve been following along, your root folder will be here: “users > yourname > sites > wordpress”.
If this is your first time doing this, your root folder should be empty except with the WordPress install from step one. Just like below.

Unpack the WordPress zip file in the folder. (AKA double click the zip file.)
You’ll see a new folder named “wordpress” appear. Rename it to something relevant to the site you will be building/testing locally.
I am going to name mine “skillcrush”.
Open the new folder. It should look just like below.

Step 9: Configuring the wp-config.php File
Now, open the “wp-config-sample.php” file in your favorite text editor. Mine is Sublime Text 2. And the really cool theme I am using is called Brogrammer, in case you were wondering.Your wp-config-sample.php file should look like this on the inside.

In line 19, replace ‘database_name_here’ with the name of your database. Remember?
Mine is called ‘skillcrush_db’. (If you forget, go back to your phpMyAdmin panel.)
Then, in lines 22 and 25, replace ‘username_here’ and ‘password_here’ with ‘root’—which is the default for the database you created before in phpMyAdmin.
Your file should now look like below. (Except with your database name matching the one you created earlier.)

Save the file and ex out of it.
And now, this is very important, rename the file from wp-config-sample.php to wp-config.php.
Just remove the word “sample” from the file name.
There is another way to configure the wp-config file at the beginning of your setup in the browser rather than in the text editor. I prefer setting it up this way because you get to work directly with the files to make sure your MAMP setup is all connected properly.
Step 10: The Famous Five Minute Install.
Now, go to your preferred browser and type in the url pointing to your site folder.For me, it would be localhost:8888/skillcrush. (Because the folder name in my root folder is “skillcrush”.)
If done correctly, you should see this screen.

Click continue, with “English (United States)” selected as the language. (Unless you would like the install to be in another language.)
And now the famous five minute install. Understand that the credentials you setup here is what you’ll use to log into the WordPress dashboard later.
So remember what you input for your username and password. (However, you can always change this information later.)
Note: if you skipped Step 9, you’ll have to set up the username and password for your database (“root”) here.

The information above is fairly self-explanatory.
But a quick note about the “Privacy” checkbox: Checking or unchecking the search engine visibility doesn’t really matter because the site is not online. Meaning a search engine can’t index the site. I unchecked mine anyway.
After you have all the information filled out, click the “Install WordPress” button.
Almost immediately you should see a success screen.

And now you can log into the WordPress dashboard.
Step 11: Logging Into the WordPress Dashboard Panel
You can log into your new local site by visiting: http://localhost:8888/site-directory/wp-adminSince I have my WordPress install in the folder named “skillcrush”, my url looks like this: http://localhost:8888/skillcrush/wp-admin
After going to the correct url to login, you should see a screen like below.

Input the username and password you created in the previous step (step 10).
After successfully logging in, you should see this in your dashboard:

Woohoo!!! You set up WordPress locally!!
If you hover above your site title in the upper left-hand corner (mine being “Skillcrush MAMP Install”), a “Visit Site” drop down option will appear.
Click it.
And you should see the 2015 theme, as pictured below.

There will be a “Hello World” post, a test comment, and a sample page.
Step 12: Using MAMP In The Future
Awesome! What a marathon! You made it to the end and you can start developing a WordPress site on your local machine. But what happens when you take a break, shut your computer down, and try to return?Logging back into your local site you just setup is simple, though.
- Turn on your MAMP server by opening the MAMP application. If it doesn’t start running automatically, click “Start Servers,” and wait for the 2 little boxes in the upper right corner to turn green, indicating MAMP is up and running.
- Visit the url, with the folder name following “localhost:8888” (mine in this instance being “localhost:8888/skillcrush”)
- To login, add “/my-admin” behind the folder name — http://localhost:8888/site-directory/wp-admin
To create a new local WordPress site, simply follow the steps in this article starting from the beginning — minus installing MAMP (it should still be on your computer) and configuring MAMP settings (steps 4 – 5).
You will still have to:
- Download the latest version of WordPress on WordPress.org and unpack the WordPress zip file in your sites folder.
- Rename the folder to correlate with your site.
- Set up a new MySQL database for the site in phpMyAdmin.
- Configure the wp-config.php file to match your new database name (use “root” again!).
- Go through the famous WordPress five minute install.
Conclusion: Why Using MAMP Rocks
In the end, using MAMP to develop WordPress sites locally has many benefits. For instance—being able to work offline, test out small changes for your live site, and much more.And while it does take some time setting it up as well as getting used to it, MAMP can make the development process much more seamless and error-free. Because there’s nothing worse than trying out a new plugin or CSS modification and finding your whole site has gone down!
If you’re having trouble setting this up, feel free to email Laurence directly at laurence@learntocodewith.me and she’ll try to help as best she can.
BY LAURENCE BRADFORD
Laurence is a self-taught freelance web developer, focusing primarily on front-end technologies. In her spare time she manages learntocodewith.me, a blog geared to beginners teaching themselves how to code. Laurence is addicted to side projects and travel.
This article originally published at Skillcrush
here
- See more at: http://dailysnoops.blogspot.in/2015/05/why-learning-to-code-can-help-you-land.html#sthash.zay0imdp.dpuf
This article originally published at Skillcrush
here
- See more at: http://dailysnoops.blogspot.in/2015/05/why-learning-to-code-can-help-you-land.html#sthash.zay0imdp.dpuf
This article originally published at Skillcrush
here 


